Sent to you by Megan via Google Reader:

There are quite a few reasons why having basic Photoshop skills beyond slicing PSD's to XHTML/CSS is essential to any web developer.
I have discussed some of those reasons in this article on my blog, but to make a long story short, there are times when you just need to do minor image editing tasks but don't want to hassle your web designer for it.
Here are common tasks and processes that web developers often need to deal with when working on a web design/web interface using Photoshop.
1. Changing the background color of an icon
As a web developer, one of the most common tasks I encounter is changing the background color of an icon or making its background transparent.
Let's take an RSS icon for example. RSS icons come in different shapes and sizes.
![]()
When you finally find the "perfect" icon, you sometimes need to modify it. One common issue is that if your site's background color is one color and the icon's background is another color, to make them seamlessly match, there is a little work we need to do to it.
If the image is in GIF format, I recommend converting it to PNG because they're similar, but PNGs will usually be smaller in file size. Read about the pros and cons of using GIF versus PNG at W3C.
To do that, open the image in Photoshop, then go to File > Save for Web & Devices (Ctrl/Cmd + Alt/Option + Shift + S), then select either PNG-8 or PNG-24 under the Optimized file format drop-down on the right-side. You'll have to see which one is better in terms of quality and file size.
(See a guide on how to save images for the web.)
Then close the original GIF file because we are done with it, and then open the image with the new format you have just saved.
Now if you look at your Layers Panel (if it's not visible, hit the F7 key to toggle the panel's visibility), you might see that there is a layer called Background.
Right-click on that layer, select Layer from Background from the menu that appears, and then click OK.
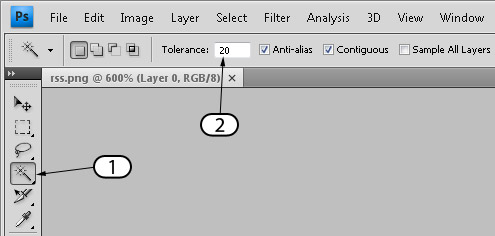
Second step: use the Magic Wand Tool (W) from the Tools Panel.
1. Click on the Magic Wand Tool.
2. Make sure that the Tolerance value is set to about 20 and that the Anti-alias and Contiguous options are checked as demonstrated below.
Then click on the white (or whatever color) background area surrounding the icon.
Make sure that the selected area doesn't "eat" too much of the shadow below the icon. If it does, play with the tolerance value a bit (and reselect the background again with the Magic Wand Tool), until you get the desired result.

To delete the background color
To delete the background and make it transparent, simply press the Delete key to clear the area below the selection. Then save it again as a PNG by going File > Save for Web & Devices, making sure that the Transparency option is checked.
To change the background color
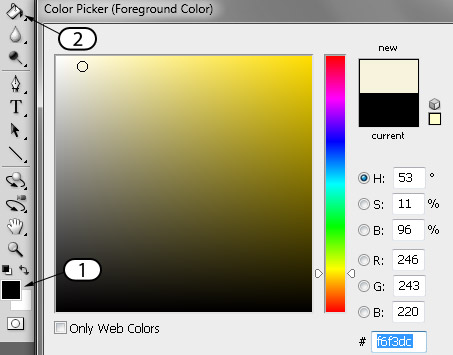
1. Click on your Foreground color, select the desired color from the Color Picker dialog window, and then click OK.
2. Click on the Paint Bucket Tool (G). If you don't see the Paint Bucket Tool, right-click on the Gradient Tool icon and choose the Paint Bucket Tool from the menu that appears.
Then, click inside the selected are around the icon to apply the color you chose.
2. Selecting a layer with Auto-Select
Selecting a layer may seem obvious: you click on the layer's name in the Layers Panel (press F7 if you don't see it).
However, finding the relevant layer can be tedious when there are many layers in your work or if the layers aren't named intuitively.
One option is to enable the Auto-Select option:
1. Click on the Move Tool (V) in the Tools Panel.
2. Choose Layer from the Auto-Select drop down.
3. Make sure to check the Auto-Select box.

After enabling Auto-Select, clicking anywhere in the canvas itself will activate the relevant layer.
3. Selecting a layer with Ctrl/Cmd + click
A second option for selecting a layer is to use the Move Tool (V)—leaving the Auto-Select option unchecked this time—and then Ctrl/Cmd + clicking on an object in the canvas to select a specific layer.
4. Isolating a layer
After selecting a layer, you may want to copy it to a new document where you can save it as a separate image.
One way to do it would be using the Crop Tool (C).
![]()
However, there is a quicker way that preserves the accurate size of that layer:
1. Hold down Ctrl/Cmd and click on the layer's thumbnail. This should make an automatic selection around the objects in that layer.
2. Press Ctrl/Cmd + C (shortcut for Edit > Copy)
3. Press Ctrl/Cmd + N to create a new document. Photoshop detects the size of the layer you want to copy and creates a new document with the same size.
4. Click Ctrl/Cmd + V to paste into the new layer.
5. Copying a layer from one document to another by drag and drop
There are many ways to copy a layer or a group of layers from one PSD file to another. However, the easiest method is simply to drag and drop them.
1. Select a layer from the Photoshop document you wish to copy from. If you need to copy multiple layers, hold down Ctrl/Cmd and click on the layers in the Layers Panel.
2. Select the Move Tool (V).
![]()
3. Click anywhere in the canvas and drag the layers up to the tab of the document you want to copy the layers to.
The window will switch to the second document. Release the mouse button in the canvas where you wish to place the copied layers in the second document.
6. Refining a selection by contracting or expanding it
In the first tip, I demonstrated how to select the background of an icon. In some cases, the selection is inaccurate and you may want to expand or contract that selection from all directions.
First, to get a closer look at your selection, press Ctrl/Cmd + + which will zoom into your work.
Go to Select > Modify > Expand or Select > Modify > Contract.

Type the number of pixels you wish to expand or contract your selection by, and then click OK.

7. Using Layer Comps
When working with many layers, it is more efficient to capture different layer visibility states. In other words, it's best to set a layer's visibility to display only the layers you want to.
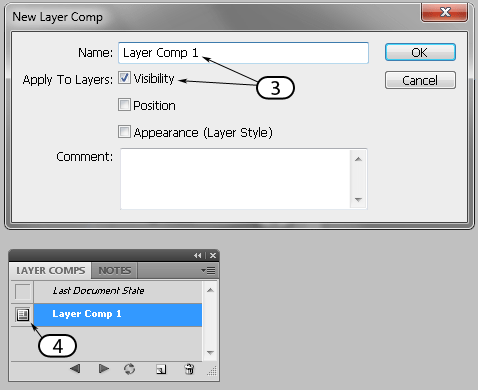
1. Display the Layer Comps Panel by go to Window > Layer Comps.
2. Click on the Layer Comps menu and select New Layer Comp or click on the Create a new layer comp button at the bottom of the Layer Comps Panel.

3. Type the name of your Layer Comp, check the Visibility option and click OK.
Toggle Layer Comps
To hide and show your layer comps, just click on the icon on the right side of the layer comp.
8. Basic image manipulation: changing colors
Another common task in Photoshop is duplicating a part of a layer for color changes or transformation.
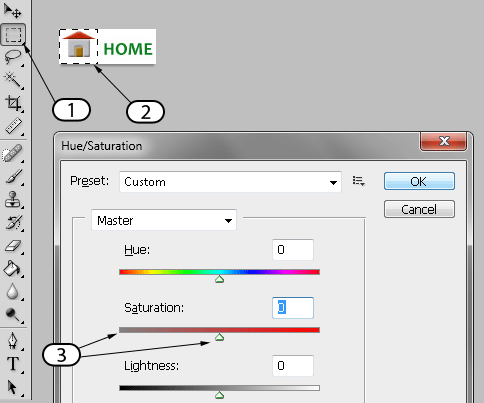
Here's an example. The following icon is used as a menu button:
![]()
How can you create a duplicate version of the house (only), and make it black and white? This is a situation that often occurs when you need to create mouseover effects on a web page.
1. Click on the Rectangular Marquee Tool (M).
2. Select the house on the canvas. Then press Ctrl/Cmd + J to duplicate it into a new layer.
3. Click Ctrl/Cmd + U to adjust Hue/Saturation for the new layer. Scroll the saturation left to turn the house to black and white.
The result:
![]()
Remember that you still have the colored version of the house. To view it, just toggle the duplicated layer's visibility.
9. Using measurement tools
As a web developer, you often need to measure objects for pixel-perfect accuracy when rendered on a web page. A common example is calculating menu item sizes for creating CSS sprites.
Here are two methods to measure elements:
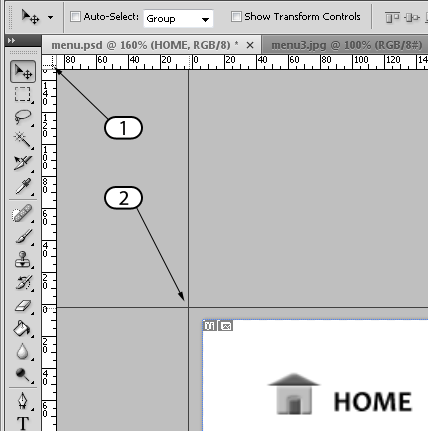
Rulers (Ctrl/Cmd + R)
1. Click, hold, and drag from the top left corner of your rulers towards the canvas.
2. Release the mouse button where you want to start the axes.
3. Zoom in (Ctrl/Cmd + +) to view finer increments of the rulers.
Tip: To change the measurement units of the rulers (from inches to pixels for example), double- click on the ruler itself to open the Units & Rulers Preference dialog window (or go to Edit > Preferences > Units & Rulers) and select the desired measurement unit.
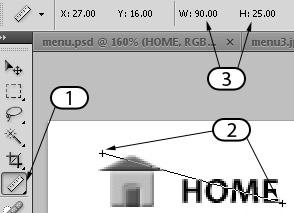
The Ruler Tool (I)
1. Click on the Ruler Tool's button on the Tools Panel (if you don't see it, right-click on the Eyedropper Tool and switch it to the Ruler Tool).
2. Click and drag from the start to end-point that you wish to measure.
3. Check the width and height indications.
Got Photoshop tips for web developers of your own? Please share it with us in the comments.
Related Content
- 21 Advanced Photoshop Tips, Tricks and Tutorials Roundup
- The 50 Best Photoshop Tutorials of 2009
- 70 Excellent Photoshop Resources
- Related categories: Photoshop and Tutorials
About the Author
 Omer Greenwald is a web developer, blogger and WordPress enthusiast. He specializes in HTML, CSS, JavaScript and PHP. You can check out his blog called WebTechWise, which shares tips and tutorials for bloggers and site administrators. To connect with the author follow him via Twitter as @WebTechWise.
Things you can do from here:
- Subscribe to Six Revisions using Google Reader
- Get started using Google Reader to easily keep up with all your favorite sites
I have been visiting various blogs for my term papers writing research. I have found your blog to be quite useful. Keep updating your blog with valuable information... Regards
ReplyDeleteYour blog post is such a good help. I will be looking forward for other great post of yours. Keep up the good job!!
ReplyDelete